Showing posts with label recycled items. Show all posts

Thursday, July 25, 2013

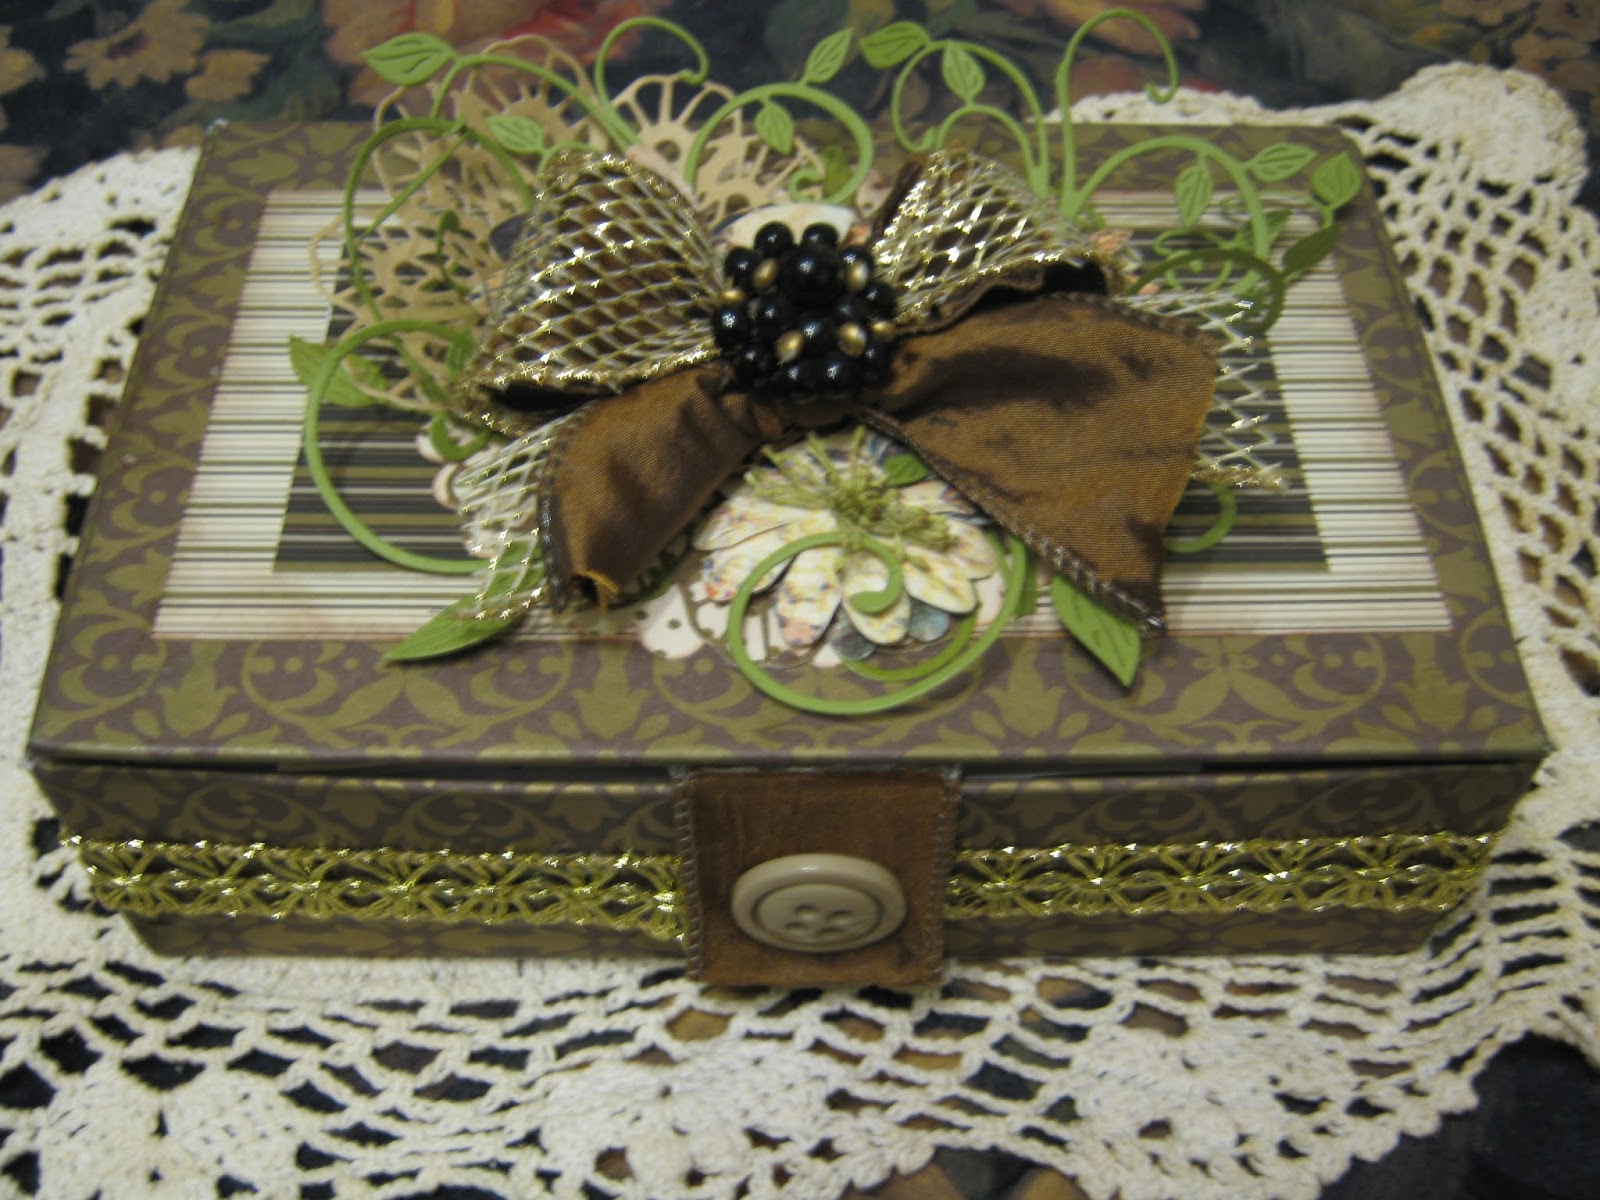
Old Love letters box


I have had this box for.....forever!
I have always kept it in my dropleaf desk. I put things in it that I want to keep. Cards from my Mom, letters from my sister's, friends, funeral cards, pictures that my Grandkids have drawn and colored for me or a last card or letter from my husband. Some of these things eventually get put in a scrapbook. But until then, I keep them in this box. I had to do a little gluing on it because it was starting to fall apart. I could have just gone out and bought another but this box and I have been through a lot. I just couldn't just throw it away.
I started out by using Modge Podge and gluing all my paper on. Next, is  a Lg Scallop Circle then a Large Doily that I cut out of some gold paper. After that, is another gold Doily that I fan-folded, some paper flowers and lots of green leaves. I added a ribbon that I made from 2 different pieces of ribbon. In the middle of my ribbon is an old clip earring that was my Mother-in-Law's.
 
Around the middle of my box I glued on some gold ribbon. Then, holding my box closed is a piece of ribbon with a button on it. On the under-side of the ribbon is some Velcro.
Boy, it sure looks better than it did! I probably should have taken a pic of it before I started.

Paper- Mocha Morning Designer Paper Pack by SU!
Scallop Circle Die- SU!
Leaves- Fanciful Flourish Die by Cheery Lynn Designs
Doily- Italian Flourish by Cheery Lynn Designs
Bow- ribbon from Robert Stanley Collection and Holiday Ribbon from Hobby Lobby
Ribbon around box- Tribbon
Flowers- ? from Hobby Lobby
Earring embelli- my Mother-in-law
Button- SU!
 
Challenges I would like to enter:
Cheery Lynn Designs- silver and/or gold
Crafty Ribbons Challenge- anything goes


Monday, March 28, 2011

For my Mom

The challenge at The Crafty Pad is "For The Mums." This is a box I made for my Mom for Mother's Day. I love to recycle things & this is a throw-away box from work. I copied & printed old & some new, pictures of Mom, our family & me. I printed them on regular copy paper & decoupaged them on the box. After it dried, I took a rag with some dark stain on it & wiped over the whole box. After that dried, I decoupaged it a couple more times. It may not show in these pictures, but it looks antiquey. I printed off a saying that I found on the internet, by that famous guy, Anonymous. :) It says,
" When I look in the mirror
& I see your face.
It reminds me that
no matter where I go or what I do,
you will always be a part of me."
Happy Mother's Day Mom!


Saturday, March 12, 2011

Angel Ornament


This is Angel Caroline. Isn't she adorable! If you played along last week, you received her in your email. If not, you can purchase her @ Designed2Delight Digital Stamps. I am entering my project @ Designed2Delight and Card Ideas. The challenge @ Card Ideas is called "ABC", anything but a card. It is also their Christmas/Winter Challenge. Go HERE for more details.
I am also entering the "Layers" challenge @ "Do You Stack Up?"
For my project, I made an Altered Coaster Ornament. I like to give credit for any ideas I use, but I honestly can't remember whose wonderful idea this was. It is also a Gift Card/ money holder. Would make a great keepsake!


Friday, March 4, 2011

Going Green!


You know the saying, "one person's trash, is another person's treasure"? I use to haul a lot of "trash" home from work. Everyday, we threw away a bunch of these open-ended cardboard cores. They had shrink wrap on them, that we used, to wrap pallets at the factory. I started collecting them & have made some interesting, one of a kind, gifts! For Christmas, I made some for my Mother to put her homemade goodies in & give to her friends & neighbors. They even had lids, made from a coaster & some thin, scrap cardboard.
You probably don't have access to these cardboard cores. But check with your janitor at work. Some places use large rolls of toilet paper in their restrooms. I have used them & they work great too. Next, you have to visit your local Pub. I don't drink alcohol, but a glass of pepsi looks real cute on one of these coasters!
To make this pencil/pen holder, I set the cardboard core on top of the coaster, drew a line around it in pencil & then cut it out. Then, I put a bead of glue all the way around the bottom of the cardboard core & then set it on top of the coaster. While the glue is still wet, take a file & smooth the edge of the coaster, so it is even with the cardboard core. Measure your core & cut patterned paper to fit & glue it on. Use your file to smooth the top, so that your paper is even with the top of the container. Don't forget to do the inside wall too! Then the fun part comes ... decorate! I used some buttons, ribbon & "Lucky Bird", the new free digital stamp by Designed2Delight Digital Stamps. It's still there, for a limited time.
Thanks for stopping by.
Card Ideas - Going Green!- make a project with a recycled item.
"do you stack up?"- Green it!- 3rd entry -paper is green & blue, Lucky's boots are green, sentiment- "feelin' green", some green clover, green buttons & this is a "green" project.

Saturday, February 5, 2011

With all my Heart

The challenge @ Peachy Keen Stamps is to alter something to use for card storage. I had this paint can that I have been saving for something special. I decided to spiff-it-up a little, & maybe my grandson could use it to store his Valentines in. I covered the can with paper that looks like jean material & some other paper that didn't look too girly. I added a little ribbon around the edges & tied a bunch of ribbon on the handle. I punched some hearts for the lid & stamped his name on them. The little boys are made from the following punches: head-ornament, shirt & shorts-large heart, legs, arms & neck-word window, hands-small heart from Heart to Heart punch, ears-1/2" circle, shoes-wide heart from Heart to Heart punch, hair-ornament trimmed & finally the faces were stamped with Peachy Keen's Everyday Character Face Parts.

On a personal note: All my free time is being spent at the Hospital & Nursing Home. My In-Laws have been very ill. Just thought I'd let you know, in case you don't hear from me much. Thanks

Saturday, November 27, 2010

Christmas Cocoa Carrier


This is the last free digital stamp from Designed2Delight for November. It's called "Christmas Cocoa". The sentiment is from their "Love A Latte" stamp set. Go HERE & check out all the other cards & projects made with this cute mug.
Here is an altered Frappuccino carton & bottles.
I colored the stamp with my SU! markers in Old Olive, Crumb Cake, Cherry Cobbler & white.
I covered the carton with SU! JOLLY HOLIDAY Designer paper. I punched a scallop border in Old Olive around the top edge. I used my BIG SHOT & cut out 4 SCALLOP CIRCLES from the #2 Die, then hand punched a SCALLOP CIRCLE in the middle to look like a wreaths & glued them on all 4 corners on the box. I punched little scallop circles from the ITTY BITTY punch pack to make the berries. The bottle caps are layered with a colored Holly Berry stamp, punched out with a 1" CIRCLE punch. Then, a 1-1/4" CIRCLE punched in red. Last, a SCALLOP CIRCLE hand punched in JOLLY HOLLY paper. I used the DESIGNER LABEL punch for the labels & added the Holly Berry stamp to them. I Added a little ribbon around each bottle & to the handle of the box &(whew!) I was done. There are 2 with homemade hot chocolate in them, 1 has chocolate mint candy canes & 1 with marshmallows.


Thursday, November 4, 2010

Napkin Holder

I have started making something for my Sister-in-law to use for her Thanksgiving Get-Together.
I took an empty toilet paper roll & cut it in half. Then, I covered it with "Pumpkin Pie" cardstock &
tied a piece of gold ribbon around it. I found a piece of scrapbook paper that had turkeys printed
all over it. I punched out each one with a scallop circle punch. I glued each turkey onto another
punched scallop circle in "soft suede" & attached it with a couple of dimensionals ( or you could
use pop-up adhesive dots). Lastly, I punched a "tiny tag", cut off one end to make a small square,
& wrote each person's name on it. I glued the name tag in the top corner.
I think they turned out cute. They were fast & easy & are strong enough to be used again.

Sunday, October 24, 2010

Quick & easy gift - Frig magnet


Here is a quick & easy gift, that you can whip up in less than 5 minutes!
Supplies:
square coaster from your local bar :)
magnetic grip clip
sticky notes
Designer paper
cardstock
Fancy Flower XLG punch
1-1/4" circle punch
large brad
glue
heavy-duty finger nail file- (the ones they use for fake nails)

Glue around edge & middle of coaster. Cover the coaster with Designer paper. Flip it over & trim along edge of coaster. Sand edges with file.
Punch a XL Fancy Flower.
Punch a 1-1/4" circle punch & glue to center of flower. Pierce a hole in center & insert brad.
Attach brad through hole in top of clip.
Place sticky note pad, ( use about 1/2 of one) under clip.
You can stamp something on bottom edge of coaster. Mine says, "A little something for you."

Friday, October 22, 2010

Halloween Cat

(Top 3 Winner)
Several years ago, someone made a candy bar holder to give out to the kids for Halloween. They used heavy cardstock & wrapped it around the candy bar & then decorated it. I thought that was a great idea but I wanted to use my pretty paper, which is not substantial enough to hold a candy bar. So, my brain went into overload & I dug through the trash (eww!) & found an empty toilet paper roll, ( I knew it was down there somewhere!) I flattened it, covered it with my DSP & then decorated it. I have made a gob of these since. My friend Debbie, @ The Paper Garden, has put a new twist to it. She put a bag of candy in it & then tied a bow at the top. Cool! Here is mine. The kitty was inspired by Ellen from Blinkin', Thinkin' & Inkin'. Somewhere, I saw someone leave the face off, so that the cat appeared to be looking the other way. I love that. It looks so real.
So, here's the recipe:
Cat- lg oval (head), word window (body), 5 petal flower (ears & legs), Lg Heart (tail), Slot (collar), whiskers (hand cut).
Pumpkins- 3/4" circle (Stem)- jewelry tag- cut at diagonal (Leaves)- 2-Step Bird wing.
(Grass)- scallop border (Moon)- 2-1/2" circle (Bat)- Bitty Bat
DSP- SU! Rich Razzleberry
Bags- SU! Medium Cello Bags

I entered this project @ Stampin Celebration Inspiration Challenge #25
A great site to go & get inspired. Click HERE & take a look!